I bought the wrong part and decided to make it fit. (E-Bay: CREE LED 50W 9006 HB4 ORANGE AMBER TWO BULB HEAD LIGHT FOG JDM LOW BEAM REPLACE). If I had to do it over again I would go with the 80W version of the same bulb. (900 vs. 1100 lumens). The 80W will likely be slightly longer and will probably fit, but I cannot guarantee that.
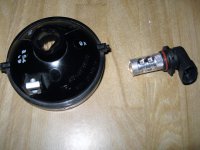
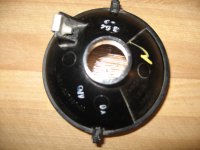
1. Remove lens assembly. Now is a good time to refinish the lens if they are milky or pitted.
2. Using a jigsaw, cut/widen the opening right up to the sides. Makes for a near-perfect fit. Dump upside down and smack to shake out all of the plastic dust. Put in a few ounces of Isopropyl, put thumb over opening and shake. Pour out. Get a paper towel with more alcohol to get the last of the dust out. Try a test fit. Grind a bit more if necessary.
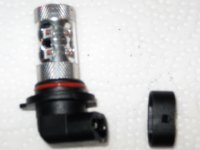
3. Cut 1/2" off the LED plastic holder to expose the leads for soldering. The natural line on the fitting is perfect. I used a small hacksaw.
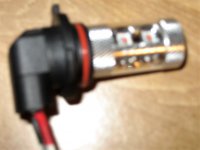
4. Cut two 6" lengths of wire and strip ends about 3/8". Tin one side of each.
5.Crimp the other side into a small (don't know the number) spade lug.
6. Cut 2 pieces of heat shrink tubing 1/2" long. (Not absolutely necessary, but I like to do things right.) Slide heat shrink on wires and solder wires to lugs inside the LED holder. Let cool for a moment then pull down heat shrink and apply heat to shrink.
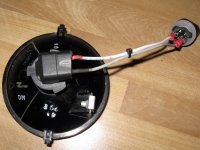
7. Place lens face down and draw a bead of superglue around the rim and also around the base of the bulb. Let set up for a minute then press into the hole. Align the wires down and off side from the set screw. Put a small weight on top to get a firm seal. Let set for 15 minutes or so.
8. Crush or hammer your old halogen light. Be sure to put in paper bag as they WILL EXPLODE. Peel off the wire leads with needle nose pliers. Press the spade lugs onto the terminals (they CANNOT be soldered to!) To be extra safe, wrap one or both with 1/2" * 1/2" of electric tape. Note that polarity is not important.
9. Reinstall, realign, turn on and enjoy!
Note: No throw codes, no heatsinks, no resistors or conversion kits are necessary. Also be aware that the beam, while bright, is not as focused as a stock halogen.
I have photos if parts of these instructions are unclear, just don't have the time to upload right now.
1. Remove lens assembly. Now is a good time to refinish the lens if they are milky or pitted.
2. Using a jigsaw, cut/widen the opening right up to the sides. Makes for a near-perfect fit. Dump upside down and smack to shake out all of the plastic dust. Put in a few ounces of Isopropyl, put thumb over opening and shake. Pour out. Get a paper towel with more alcohol to get the last of the dust out. Try a test fit. Grind a bit more if necessary.
3. Cut 1/2" off the LED plastic holder to expose the leads for soldering. The natural line on the fitting is perfect. I used a small hacksaw.
4. Cut two 6" lengths of wire and strip ends about 3/8". Tin one side of each.
5.Crimp the other side into a small (don't know the number) spade lug.
6. Cut 2 pieces of heat shrink tubing 1/2" long. (Not absolutely necessary, but I like to do things right.) Slide heat shrink on wires and solder wires to lugs inside the LED holder. Let cool for a moment then pull down heat shrink and apply heat to shrink.
7. Place lens face down and draw a bead of superglue around the rim and also around the base of the bulb. Let set up for a minute then press into the hole. Align the wires down and off side from the set screw. Put a small weight on top to get a firm seal. Let set for 15 minutes or so.
8. Crush or hammer your old halogen light. Be sure to put in paper bag as they WILL EXPLODE. Peel off the wire leads with needle nose pliers. Press the spade lugs onto the terminals (they CANNOT be soldered to!) To be extra safe, wrap one or both with 1/2" * 1/2" of electric tape. Note that polarity is not important.
9. Reinstall, realign, turn on and enjoy!
Note: No throw codes, no heatsinks, no resistors or conversion kits are necessary. Also be aware that the beam, while bright, is not as focused as a stock halogen.
I have photos if parts of these instructions are unclear, just don't have the time to upload right now.